
Tl;dr: How to send weekly email updates by sending email through Google sheets automation with a step by step explanation of the code
A lot of people use Google Sheets to collaborate on a wide number of topics. Many use it to manage their KPIs. Do you know what no one knows how to do that would be really cool if it was possible?
Sending an email update directly from Sheets!
Yes, that’s right you can and personally, I had no clue you could do that until this weekend. I used it to make a sweet OKR, PPP and KPI tracking sheet which would then send out an update of the PPPs on a weekly basis, at a time and date I picked.
I recommend you get it so you can see how it works to put this all in perspective.
Now, this is going to be a functional class, so let’s just get into things.
Note, I don’t know how to code. I had to teach myself how to do this. So if you can’t code, trust me you can figure it out as I did!
The setup for Google sheets automation
Sheet setup
Open up Google Sheets.
Name the sheet ‘System.’
You want to add a few data points now.
In the first row write in: Email address, Message, Person, Email count and type 1 in E.
In the second row add the data
It should look like this:

Let me explain what’s happening here.
- Email address: You type in the email addresses (or link them to emails in another sheet like I did)
- Message: I made a super complex formula to format an email as I want
- Person: I link the name of the person getting the email so the Message addresses it to that person in the body of the email
- Email count: D1 is text, it doesn’t do anything. E2 is where I have a count function which tells me how many people are meant to get an email. This is important as the code we are going to use reference it!
Of course, you can set up your sheet differently and write your own code, but I’m going to teach you how to do the exact example I have done.
Script setup
There is a hidden section (to me at least) called ‘Script editor.’ You will find it under Tools in the menu.

Open that up and that’s where you write the script. There will be only 3 lines when you open it for the first time.
It’s here where you are going to copy and paste the code. Let’s look at the script now to understand what it does.
The script
Here is a screenshot so you see what it should look like:

And now here is the code so you can paste it in.
function sendEmails() {
// Get the sheet where the data is, in sheet 'system'
var sheet = SpreadsheetApp.getActiveSpreadsheet().getSheetByName("System")
var startRow = 2; // First row of data to process since there is a header row
var numRows = sheet.getRange(1,5).getValue(); // Number of rows to process is set by a formula which counts rows
// Fetch the range of cells A2:B6 where the emails and messages are
var dataRange = sheet.getRange(startRow, 1, numRows, 2)
// Fetch values for each row in the Range to input into the mailing system
var data = dataRange.getValues();
// This processes the emails you want to send
for (i in data) {
var row = data[i];
var emailAddress = row[0]; // First column is the email address
var message = row[1]; // Second column is the message
var subject = "READ: Weekly PPP update"; // This is the subject of the email
// This parses the data for the email to send
MailApp.sendEmail(emailAddress, subject, message);
}
}
What are these // things?
See those “//”? These are used to comment. Using // means to a computer ‘ignore this stuff, it’s for puny humans.’
I’ve used this commenting system to explain every line of code for you. But let’s go through it
The code explained
function sendEmails() {- This creates a name for the script
// Get the sheet where the data is, in sheet 'system'
var sheet = SpreadsheetApp.getActiveSpreadsheet().getSheetByName("System")- This defines where the data is coming from. It comes from you System sheet, right? So this is the interesting bit: .getSheetByName(“System”)
- You see at the end it says “System” and I told you to name the sheet System. That’s why. If you see template script in Google, it always just pulls from the ‘active sheet’ which is fine if you only have one sheet and do your updates manually. But we will have multiple sheets and an automated system. So we have to tell the computer where EXACTLY we want it to do the witchcraft
- So if you want your sheet to be called something else, you just change it to magic, like this .getSheetByName(“magic”)
startRow = 2; // First row of data to process since there is a header row- Look at the sheet. you wrote email, name etc in row 1. That’s not useful
- So you tell the script to start in the second row since that’s where the goodies are. If your emails were in row 3, you would write row 3
var numRows = sheet.getRange(1,5).getValue(); // Number of rows to process is set by a formula which counts rows- This is a little funkier. In the sheet, you inserted the email count in E1
- The way scripts think about cell references is Row Column. So E1 is 1, 5. Row one, column 5.
- So look here: sheet.getRange(1,5)
- This says look in E1. If your email count was in A1, you would write sheet.getRange(1,1)
// Fetch the range of cells A2:B6 where the emails and messages are
var dataRange = sheet.getRange(startRow, 1, numRows, 2)- So remember the Row, Column order? The longer way or writing this in this function is: Row, Column, Number of Rows, Number of Columns
- This function tells scripts the exact area where they extract the data to parse and send emails
- We only need the email and message for the email automator. So Scripts needs to be told that. The way we do that is tell it where to start and where to end
- sheet.getRange(Row, Column, Number of Rows, Number of Columns) becomes sheet.getRange(startRow, 1, numRows, 2)
- Why are there names in here? Well we defined startRow and numRows above! 1 is the first column and 2 means the first two columns where email and message are situated. Yes, you could do it differently. Have a play?
// Fetch values for each row in the Range to input into the mailing system
var data = dataRange.getValues();- This just tells the script to steal the data and store it as the name ‘data’
// This processes the emails you want to send
for (i in data) {
var row = data[i];- This starts the programme (basically)
var emailAddress = row[0]; // First column is the email address- Says the email is in the first row (0 is the first line as far as it is concerned in our array)
var message = row[1]; // Second column is the message- Says the message is in the second column
var subject = "READ: Weekly PPP update"; // This is the subject of the email- Here you can set the name of the email subject you will send!
- If you want to send an email with the subject “check out this blog on how to automate Sheets” you would enter this
- var subject = “check out this blog on how to automate Sheets”;
// This parses the data for the email to send
MailApp.sendEmail(emailAddress, subject, message);
}
}- This sets out the structure in an email function (MailApp) which does the smart stuff
- We’ve told it we want to use the email address, the subject and the message
- The “for (i in data) {” stuff at the start of the process creates a loop to send an email to each person (The count function says how many loops run, e.g. 2 would mean two loops and two emails)
That’s the code you need to play with.
I know this might be a lot to get your head around, but you can. If you need to change any code to do something else, then check the documentation. Yes, it seems like trying to understand a Latin word by being told to read the definition in a Latin dictionary, but it’s possible 😉
The documentation is here: https://developers.google.com/apps-script/reference/mail/
Automating the sending of the emails
Now, I spent ages Googling code to figure out how to send emails at the date and time I wanted. I did… then I realized that I wanted this to work in any country… so next mission was to figure out how to adjust the sheet to the time zone of each person! I figured that out… and then I found a really dumb, simple way of doing it! Gosh darn!
Let’s forget that code… Just do this.
If you want to change the timing or day, do this:

You need to click on the clock button. The settings are easy to understand:
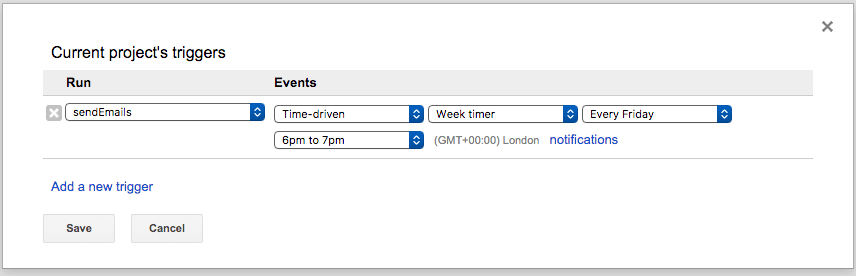
Change ‘Every Friday’ to ‘Every Monday’ if you want to send on Monday. You can set things daily by changing week timer. You change the time button… well you guess. Fiddle, press save. Done. FML.
Authorising Gmail so it actually, like works
Now it will send the email from your Google account, so you need to authorise Google to do that for your account. You do this as follows:

The Google sheets automation does a lot of the heavy lifting
There is a lot of fancy stuff you can do if you can code good (I can’t and can do it with Excel). All the formatting etc for the message is done in Excel. What I had to do to make this super dynamic is really complicated and would take an hour to explain, so I’m not going to 😉 So figure out how you want to make use of your new superpower now.
I hope learning how to automate email updates through Google sheets automation was useful to you! If it was, be social and push one of the pretty buttons below:
Comments 2
…or just use Labnol’s $29 data addon (lifetime license, yup)
😉
Author
In my experience ‘free’ carries a lot of weight.